In this post we will take a look at two hybrid solutions to forward DNS requests from your on-premises Windows environment to Azure. I’m using Azure DNS Private Resolver and 1 Ubuntu VM with dnsdist for this test setup. The goal is to disable public network access for Azure Arc and start using internal DNS forwarders.
Existing setup for this test (required):
- On-prem Windows Server 2022 Lab
- VPN Gateway (VpnGw1)
- VPN IPsec connection between your on-premises and Azure environment
- Virtual Network (10.0.0.0/16), Frontend Subnet (10.0.0.0/24)
- On-premises Network (192.168.1.0/24)
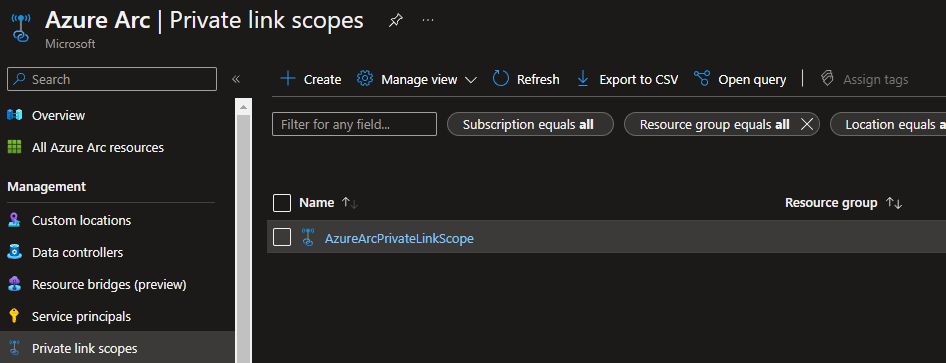
- Azure Arc Private Link Scope
Ubuntu VM with dnsdist
It is sufficient to create a small VM with Ubuntu 20.04 or 22.04 minimal to test the functionality. I used the following parameters in the template:
- VM Size: Standard_B1s
- Disk type: Standard_LRS
- publicIpAddressSku: Basic
I used the following commands (Replace MyVnet, RGname and CW-DNS-01 with your values):
## Place virtual network configuration into a variable. ##
$net = @{
    Name = 'MyVnet'
    ResourceGroupName = 'RGname'
}
$vnet = Get-AzVirtualNetwork @net

## Place subnet configuration into a variable. ##
$sub = @{
    Name = 'Frontend'
    VirtualNetwork = $vnet
}
$subnet = Get-AzVirtualNetworkSubnetConfig @sub

## Get name of network interface and place into a variable ##
$int1 = @{
    Name = 'CW-DNS-01'
    ResourceGroupName = 'RGname'
}
$vm = Get-AzVM @int1

## Place network interface configuration into a variable. ##
$nic = Get-AzNetworkInterface -ResourceId $vm.NetworkProfile.NetworkInterfaces.Id

## Set interface configuration. ##
$config =@{
    Name = 'ipconfig1'
    PrivateIpAddress = '10.0.0.10'
    Subnet = $subnet
}
$nic | Set-AzNetworkInterfaceIpConfig @config -Primary

## Save interface configuration. ##
$nic | Set-AzNetworkInterface
Copy the following config and paste it in a new text file: C:/Azure-VM/config.sh
#!/bin/sh
echo "setACL('10.0.0.0/16')
setACL('192.168.1.0/24')
setLocal('10.0.0.10:53')
newServer('168.63.129.16')" >> /etc/dnsdist/dnsdist.conf

service dnsdist restart
Run the following commands (replace RGname and CW-DNS-01 with your values):
Start-AzVM -Name 'CW-DNS-01' -ResourceGroupName RGname

Invoke-AzVMRunCommand `
   -ResourceGroupName 'RGname' `
   -Name 'CW-DNS-01' `
   -CommandId 'RunShellScript' `
   -ScriptString 'sudo apt-get update && sudo apt-get upgrade -y'

Invoke-AzVMRunCommand `
   -ResourceGroupName 'RGname' `
   -Name 'CW-DNS-01' `
   -CommandId 'RunShellScript' `
   -ScriptString 'apt-get install -y dnsdist && systemctl enable dnsdist'

Invoke-AzVMRunCommand `
   -ResourceGroupName 'RGname' `
   -Name 'CW-DNS-01' `
   -CommandId 'RunShellScript' `
   -ScriptPath 'C:/Azure-VM/config.sh'

   Invoke-AzVMRunCommand `
   -ResourceGroupName 'RGname' `
   -Name 'CW-DNS-01' `
   -CommandId 'RunShellScript' `
   -ScriptString 'cat /etc/dnsdist/dnsdist.conf && reboot'
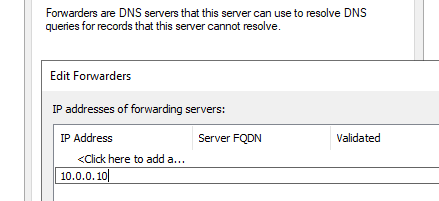
Go to your on-premises DNS server and point the forwarder to 10.0.0.10.
Test the following records from your on-premises Windows server:
- gbl.his.arc.azure.com
- weu.his.arc.azure.com
- agentserviceapi.guestconfiguration.azure.com
- westeurope-gas.guestconfiguration.azure.com
- westeurope.dp.kubernetesconfiguration.azure.com
Output:
PS C:\Windows\system32> nslookup gbl.his.arc.azure.com
Server: localhost
Address: 127.0.0.1

Non-authoritative answer:
Name: gbl.privatelink.his.arc.azure.com
Address: 10.0.0.4
Aliases: gbl.his.arc.azure.com
If you don’t have a Private DNS Zone yet, you can create one by creating a Private Link Scope:
Azure DNS Private Resolver
Go to portal.azure.com and open your vnet (10.0.0.0/16 in my case). Go to subnets & add 2 subnets.
Note: Endpoint creation with subnet of address space overlapping 10.0.0.0/24 through 10.0.16.0/24 might fail.
Subnets:
10.0.20.0/24 Name: InboundEndpointPrivateDnsResolver
10.0.21.0/24 Name: OutboundEndpointPrivateDnsResolver
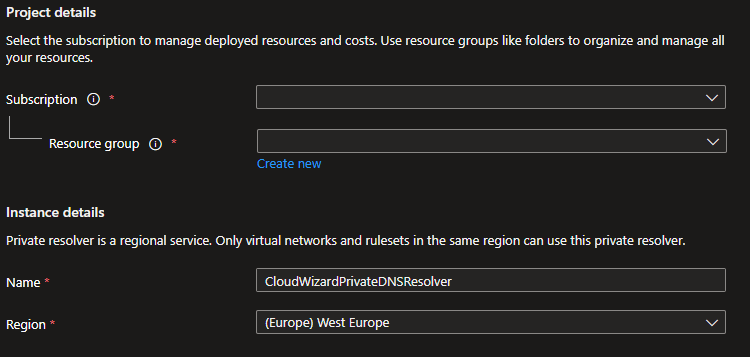
Open DNS private resolvers > Create a DNS private resolver.
Select your subscription, resource group and virtual network.
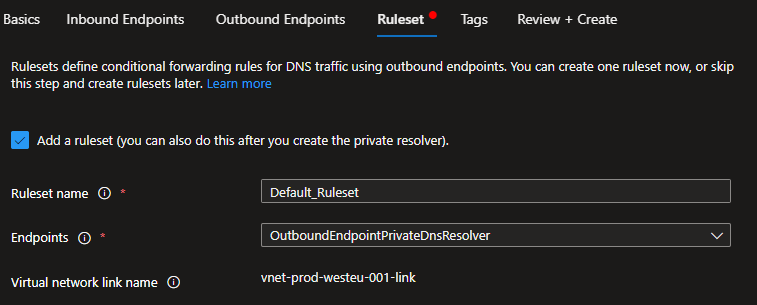
Click next and select your subnets for inbound and outbound. Add a ruleset and select your endpoint.
Add your first rule. Enter your domainname and point the destination to the PrivateEndpoint.nic IP address.
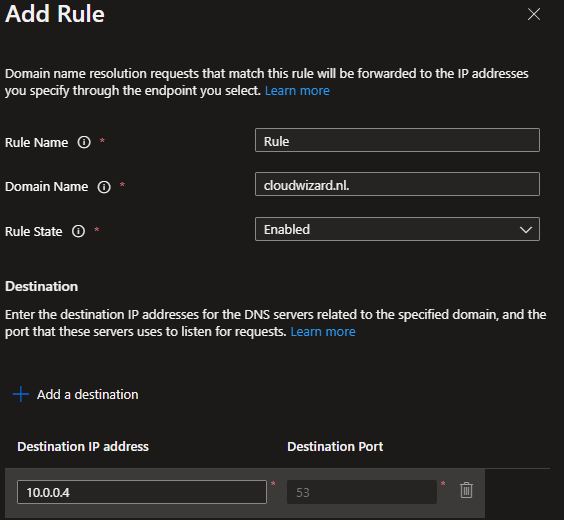
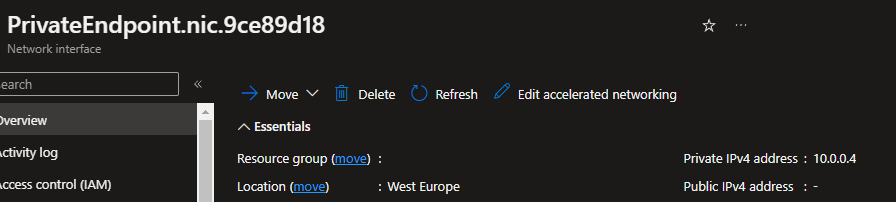
Go to the network interface to check the IP address and confirm that it is correct.
Click Review + Create and apply the configuration. Once created, open the Private DNS Resolver.
Go to inbound endpoints and copy the IP address.
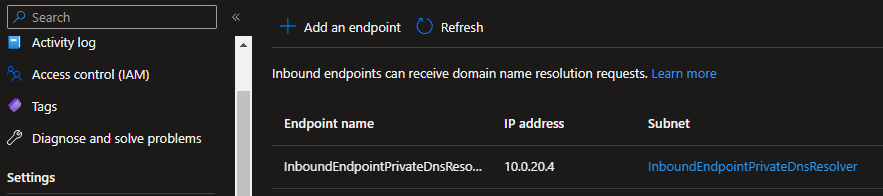
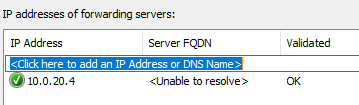
Go to your on-premises DNS server and point the forwarder to 10.0.20.4.
Test the following records from your on-premises Windows server:
- gbl.his.arc.azure.com
- weu.his.arc.azure.com
- agentserviceapi.guestconfiguration.azure.com
- westeurope-gas.guestconfiguration.azure.com
- westeurope.dp.kubernetesconfiguration.azure.com
Output:
PS C:\Windows\system32> nslookup gbl.his.arc.azure.com
Server: localhost
Address: 127.0.0.1

Non-authoritative answer:
Name: gbl.privatelink.his.arc.azure.com
Address: 10.0.0.4
Aliases: gbl.his.arc.azure.com
You can now test both DNS resolvers.
Links:
Azure DNS Private Resolver:
https://learn.microsoft.com/en-us/azure/dns/dns-private-resolver-overview
Azure DNS Pricing:
https://azure.microsoft.com/en-us/pricing/details/dns/
Azure Pricing Calculator:
https://azure.microsoft.com/en-us/pricing/calculator/